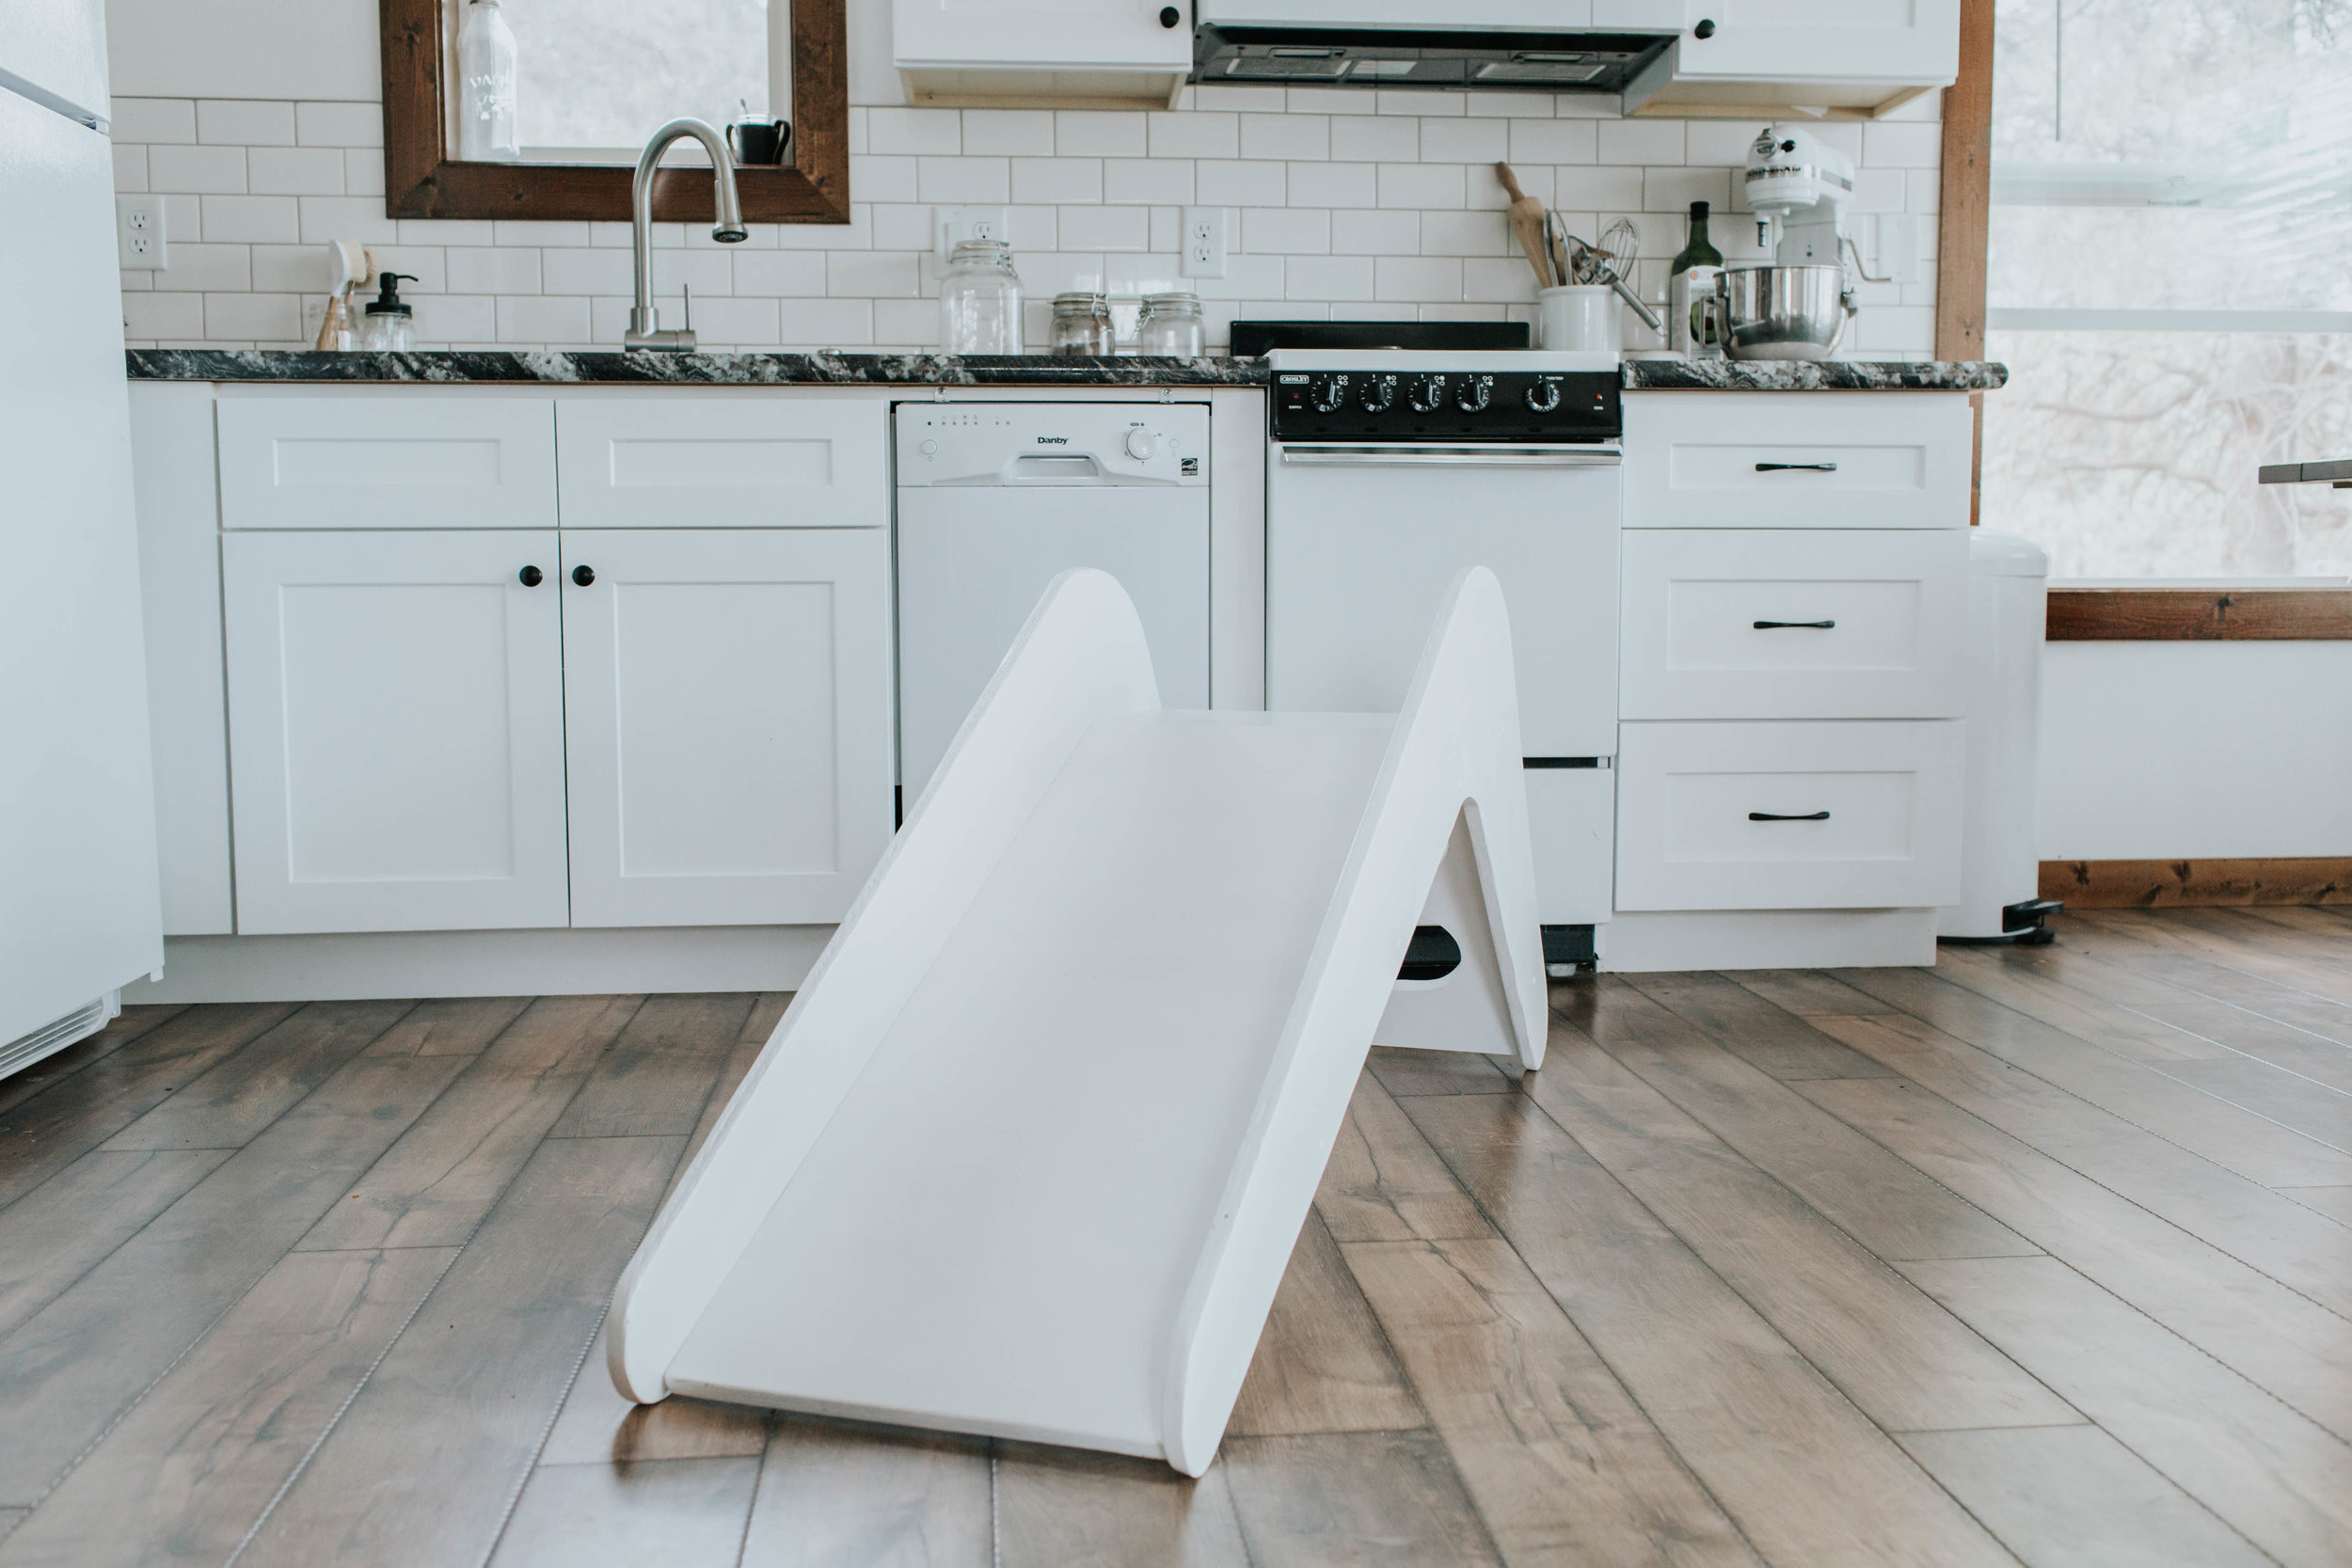
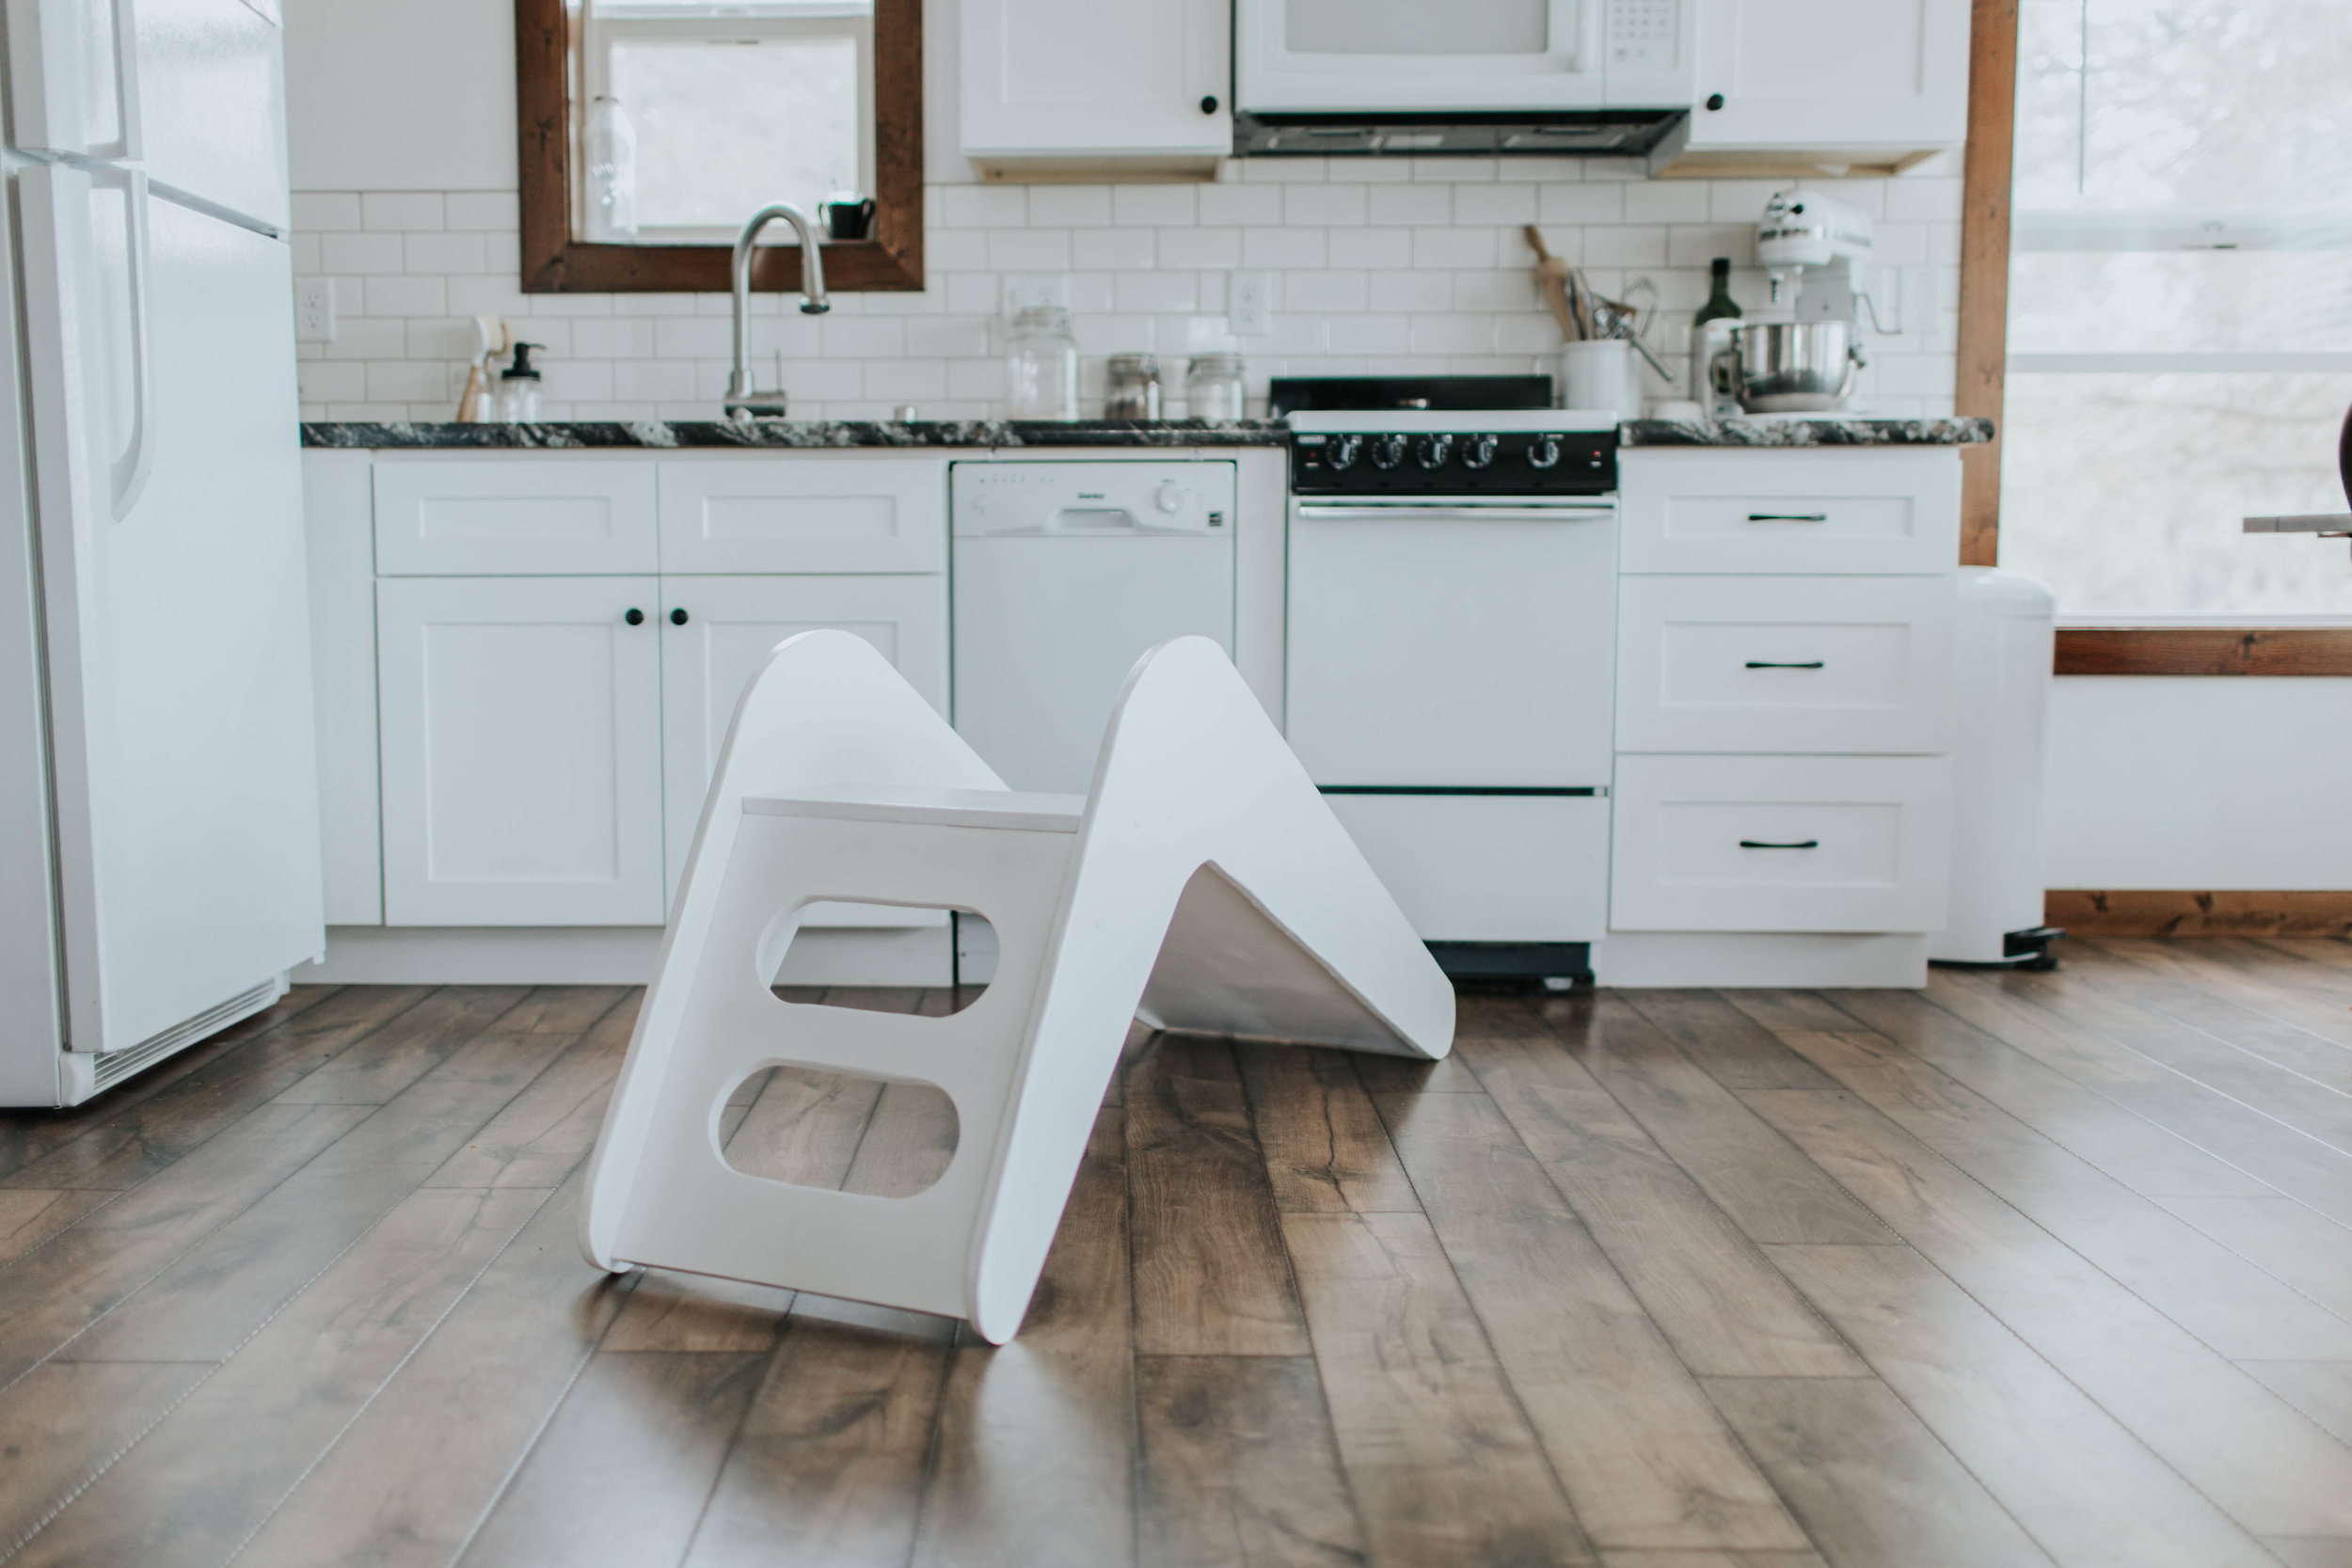
DIY Indoor Wooden Slide
As Locke’s first birthday approached, I asked a few friends what their kid’s favorite toys were when they were his age. Several people said their kids loved their little indoor Fisher-price slides.
Over the last few years, I’ve been trying to adopted the quote by William Morris that says, “Have nothing in your home that you do not know to be useful, or believe to be beautiful.”
It’s really important to me to try and find toys and baby/kid gear that I think is aesthetically pleasing. I know these items are going to be a part of our home for a long time and we don’t really have any hidden storage spaces – so I can’t hide anything that we bring in.
I started doing a Pinterest search to try and find something other than the brightly colored plastic slides I see so often, but I couldn’t find anything!

I looked for a few days and finally stumbled upon a company in Germany that sells beautiful wooden slides…for over $300. I don’t know what shipping would have been, but I’m guessing not cheap.
I decided to try and make one instead of dish out $300+ for my one year old
I love how our slide turned out. It is super cute and I don’t mind it being in my living room one bit.
I’ve posted pictures of our slide on Instagram and have had tons of mamas ask for a tutorial. I’m going to do my absolute best, but I am not a pro at all!
Hopefully my explanations makes sense, but feel free to ask any questions! If your husband or father is reading this tutorial, I apologize in advance because I’m writing this for mamas, in layman’s terms – because that’s how I understand best

My heart is for you to have images of your everyday that you take yourself, with whatever camera you have available to you, whether it’s an old iPhone or an entry level DSLR camera.
If you love taking pictures of your kids but don’t have this whole photography thing totally figured out – I created a free course just for you!
Cost:
The whole project cost me about $75.
Between my dad and I, we owned all of the tools that we needed, but you can rent tools from Home Depot if you don’t already own them. I’ve also been known to ask neighbors or friends to borrow their tools. Be creative
Supplies:
(Throughout this tutorial I’ve included pictures of every item/tool listed below)
Full sheet (4ft x 8ft ) Pre-sanded Plywood
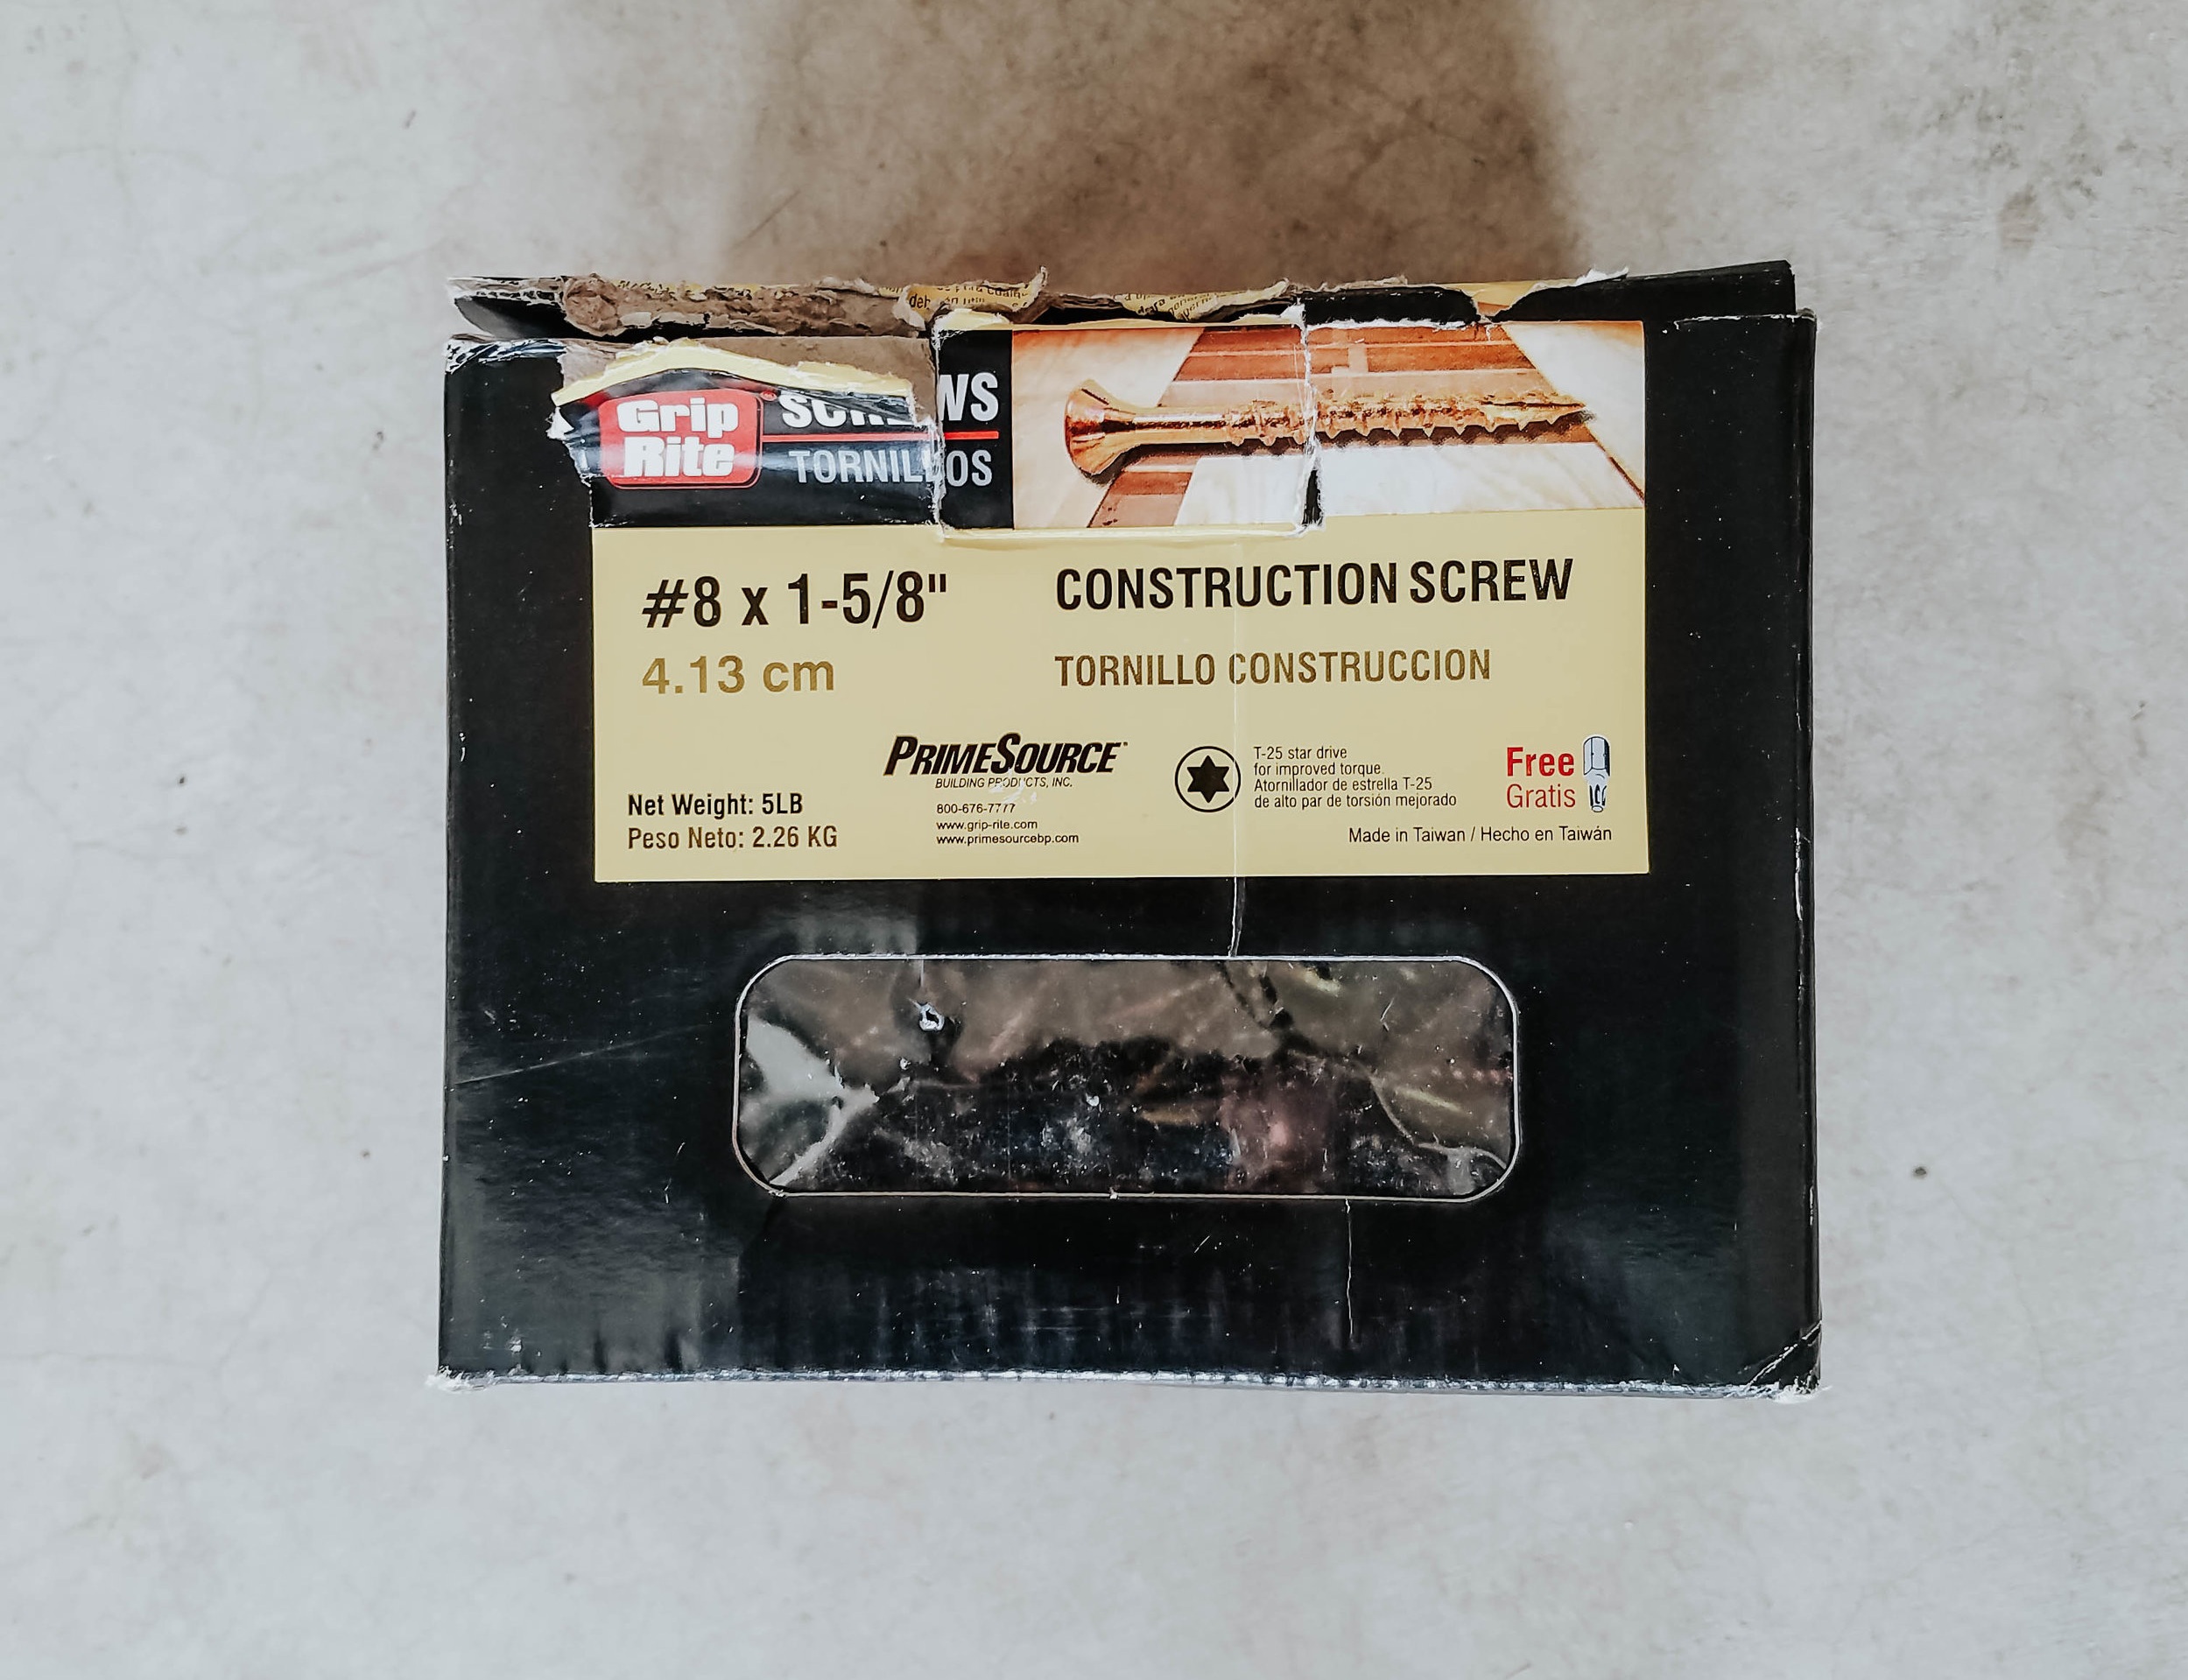
Construction Screws – #8 x 1-⅝” (4.13cm)
Paint: Semi-Gloss Acrylic Interior Paint + Primer (Super White by Benjamin Moore)
Satin Clear Gloss Spray: Krylon Colormaster Acrylic Crystal Clear Gloss Spray: Clear (non-yellowing)
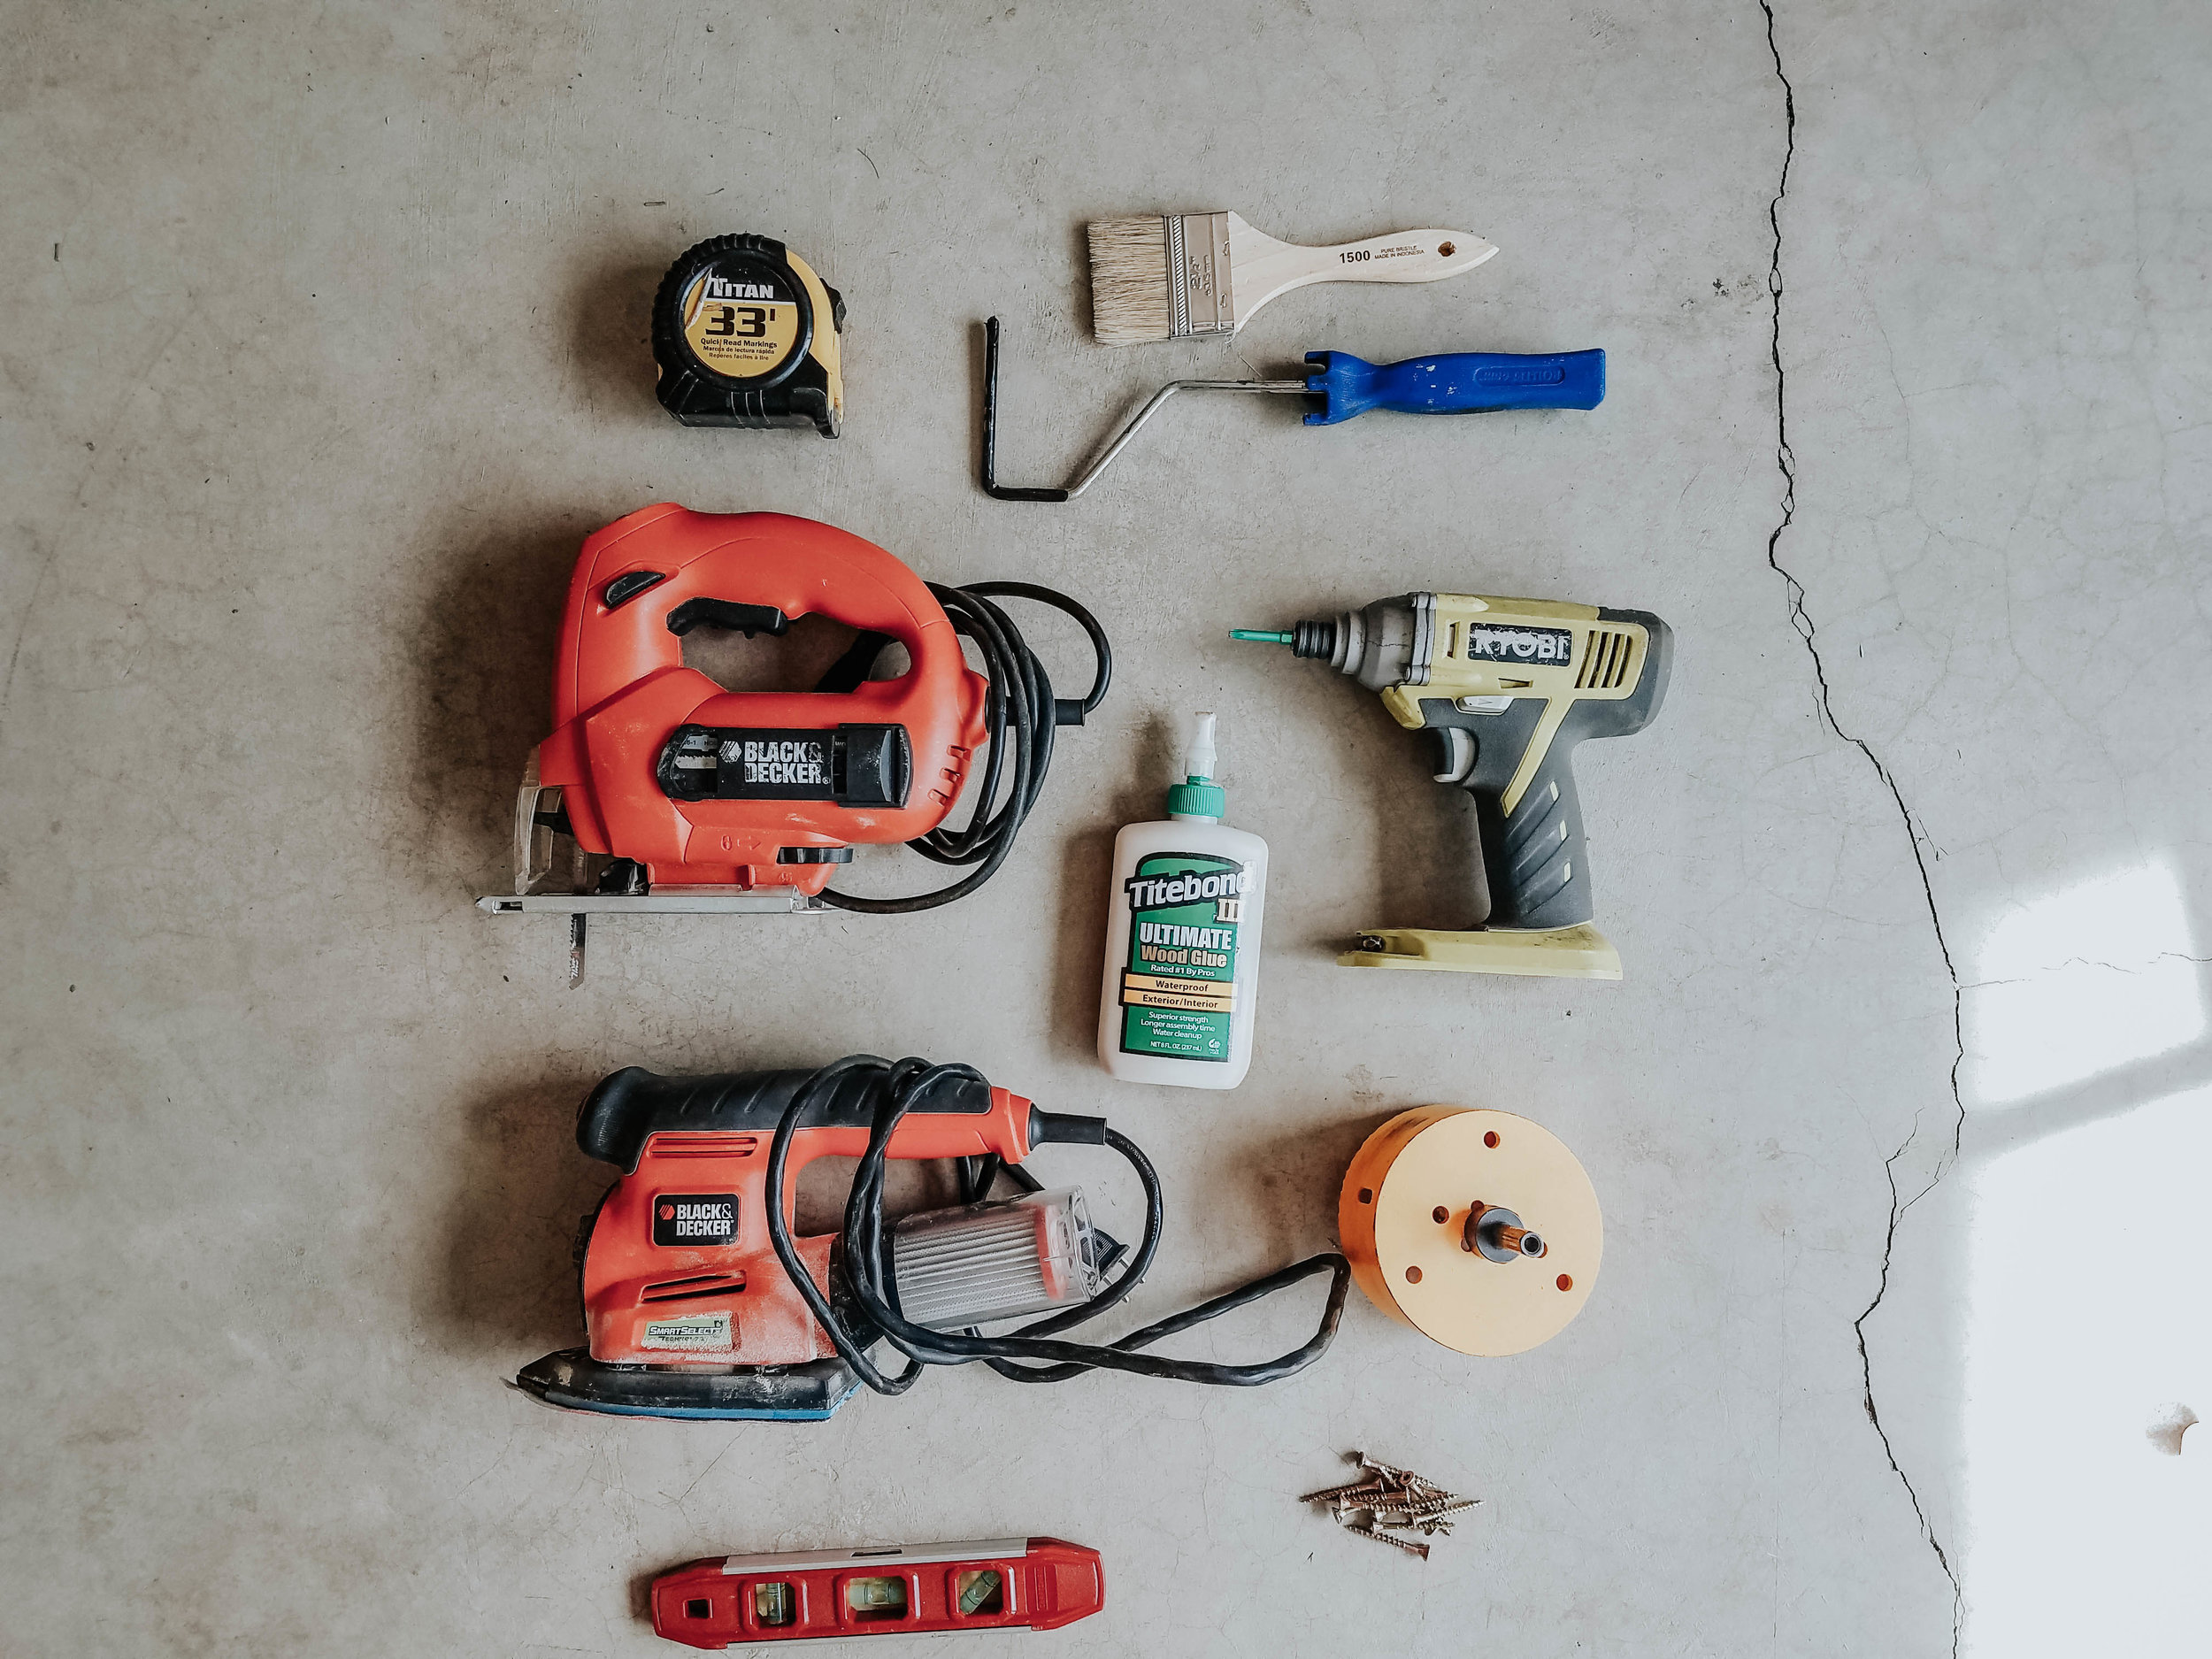

Tools:
Level
Drill
4 – ½ / (114 mm) Metal Hole Saw (optional)*
Table Saw
Jig Saw
Small Paint Roller
Paint Brush
Electric Sander (optional)**
Sandpaper (80 grit)
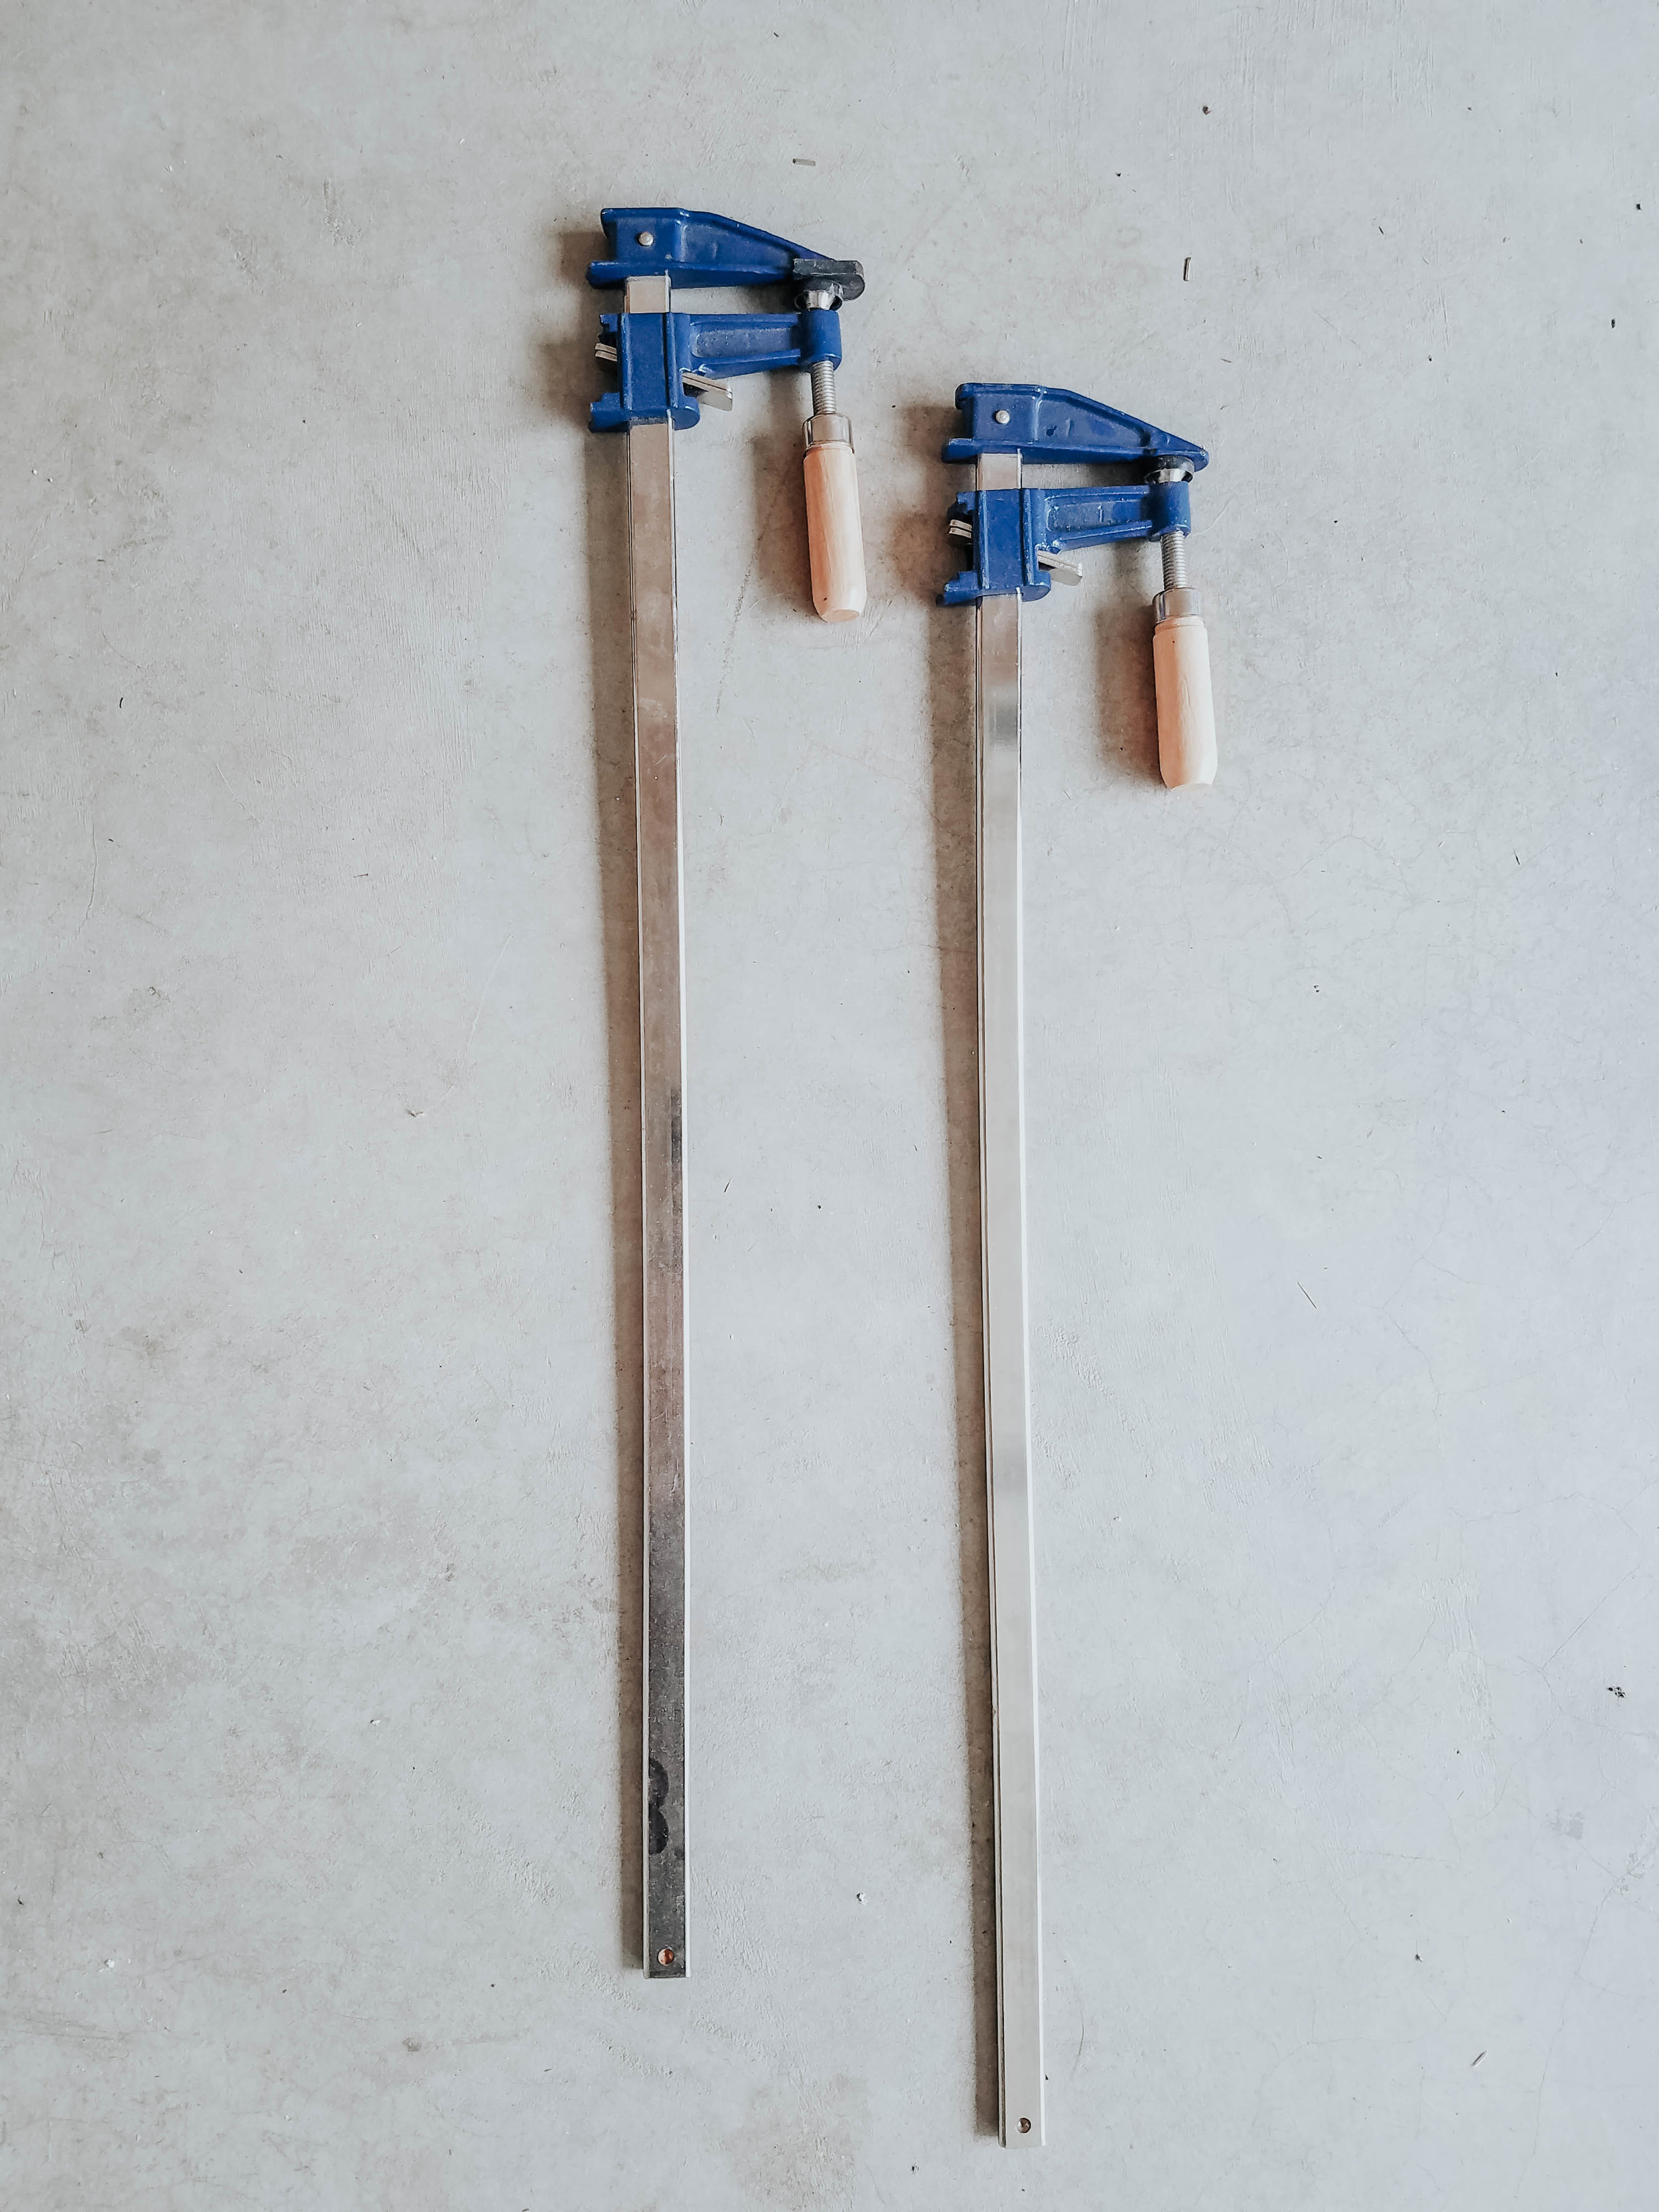
Wood Clamps (we used 24 inch clamps)
* We own a large metal hole saw (4 – ½ / 114 mm). We used it to make the holes in the ladder (see step 8). You can also just use the largest drill bit you have available & use the jigsaw to cut out the entire oval shape.
** You can just use sandpaper and sand the pieces by hand if you don’t have access to an electric sander. You may hate your life though
Wood Cuts:
From the piece of plywood, you will need to make the following cuts (see steps 1-6 for details and instructions).
Side Piece 1 (see step 1-3)
Side Piece 2 (see step 4-5)
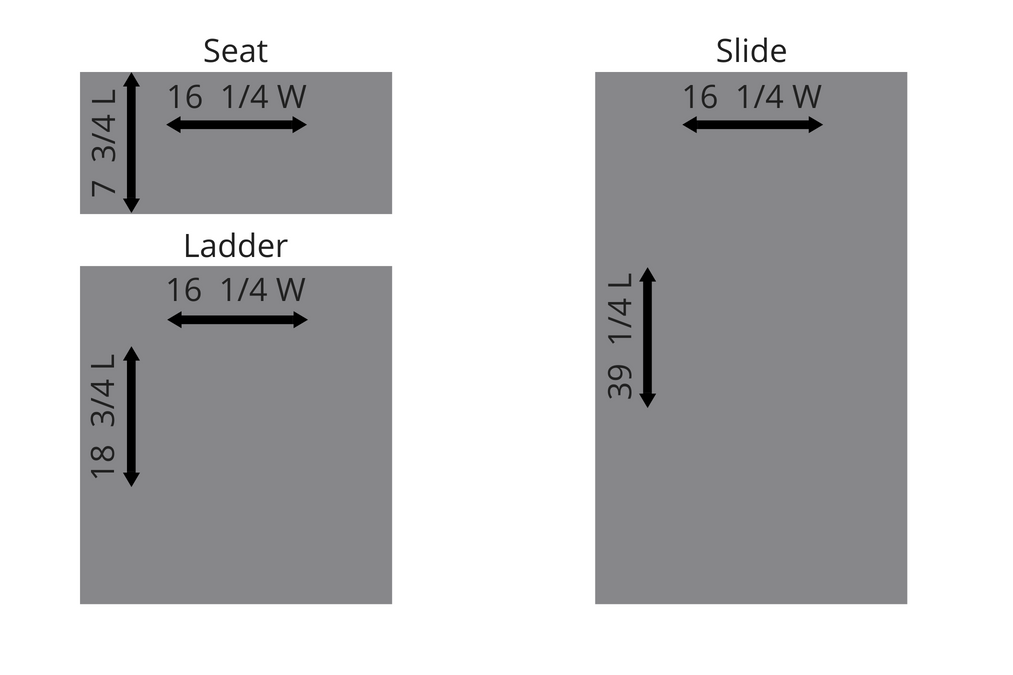
Seat Piece: 7 ¾ inch (L) x 16 ¼ inch (W)
Slide Piece: 39 ¼ inch (L) x 16 ¼ inch (W). The top of this board (the 16 ¼ inch side) needs to be cut at an angle (see step 6 for details)
Ladder Piece: 18 ¾ inch (L) x 16 ¼ inch (W). The top of this board (the 16 ¼ inch side) needs to be cut at an angle (see step 6 for details).
Color:
I really like the color ‘Super White’ by Benjamin Moore (it’s pure white, so it doesn’t have any yellow/green tint to it). I wanted to be able to wipe it down so I bought it in a semi-gloss and I purchased it as a paint + primer combo.
You could also leave the slide natural, but you’ll still probably want to put a clear coat on it to make it easier to slide down (see step 14).
The clear coat may make the wood turn a slightly different color though, so you’ll want to test it out on a scrap piece to make sure you like the result.
Instructions:

Step One:
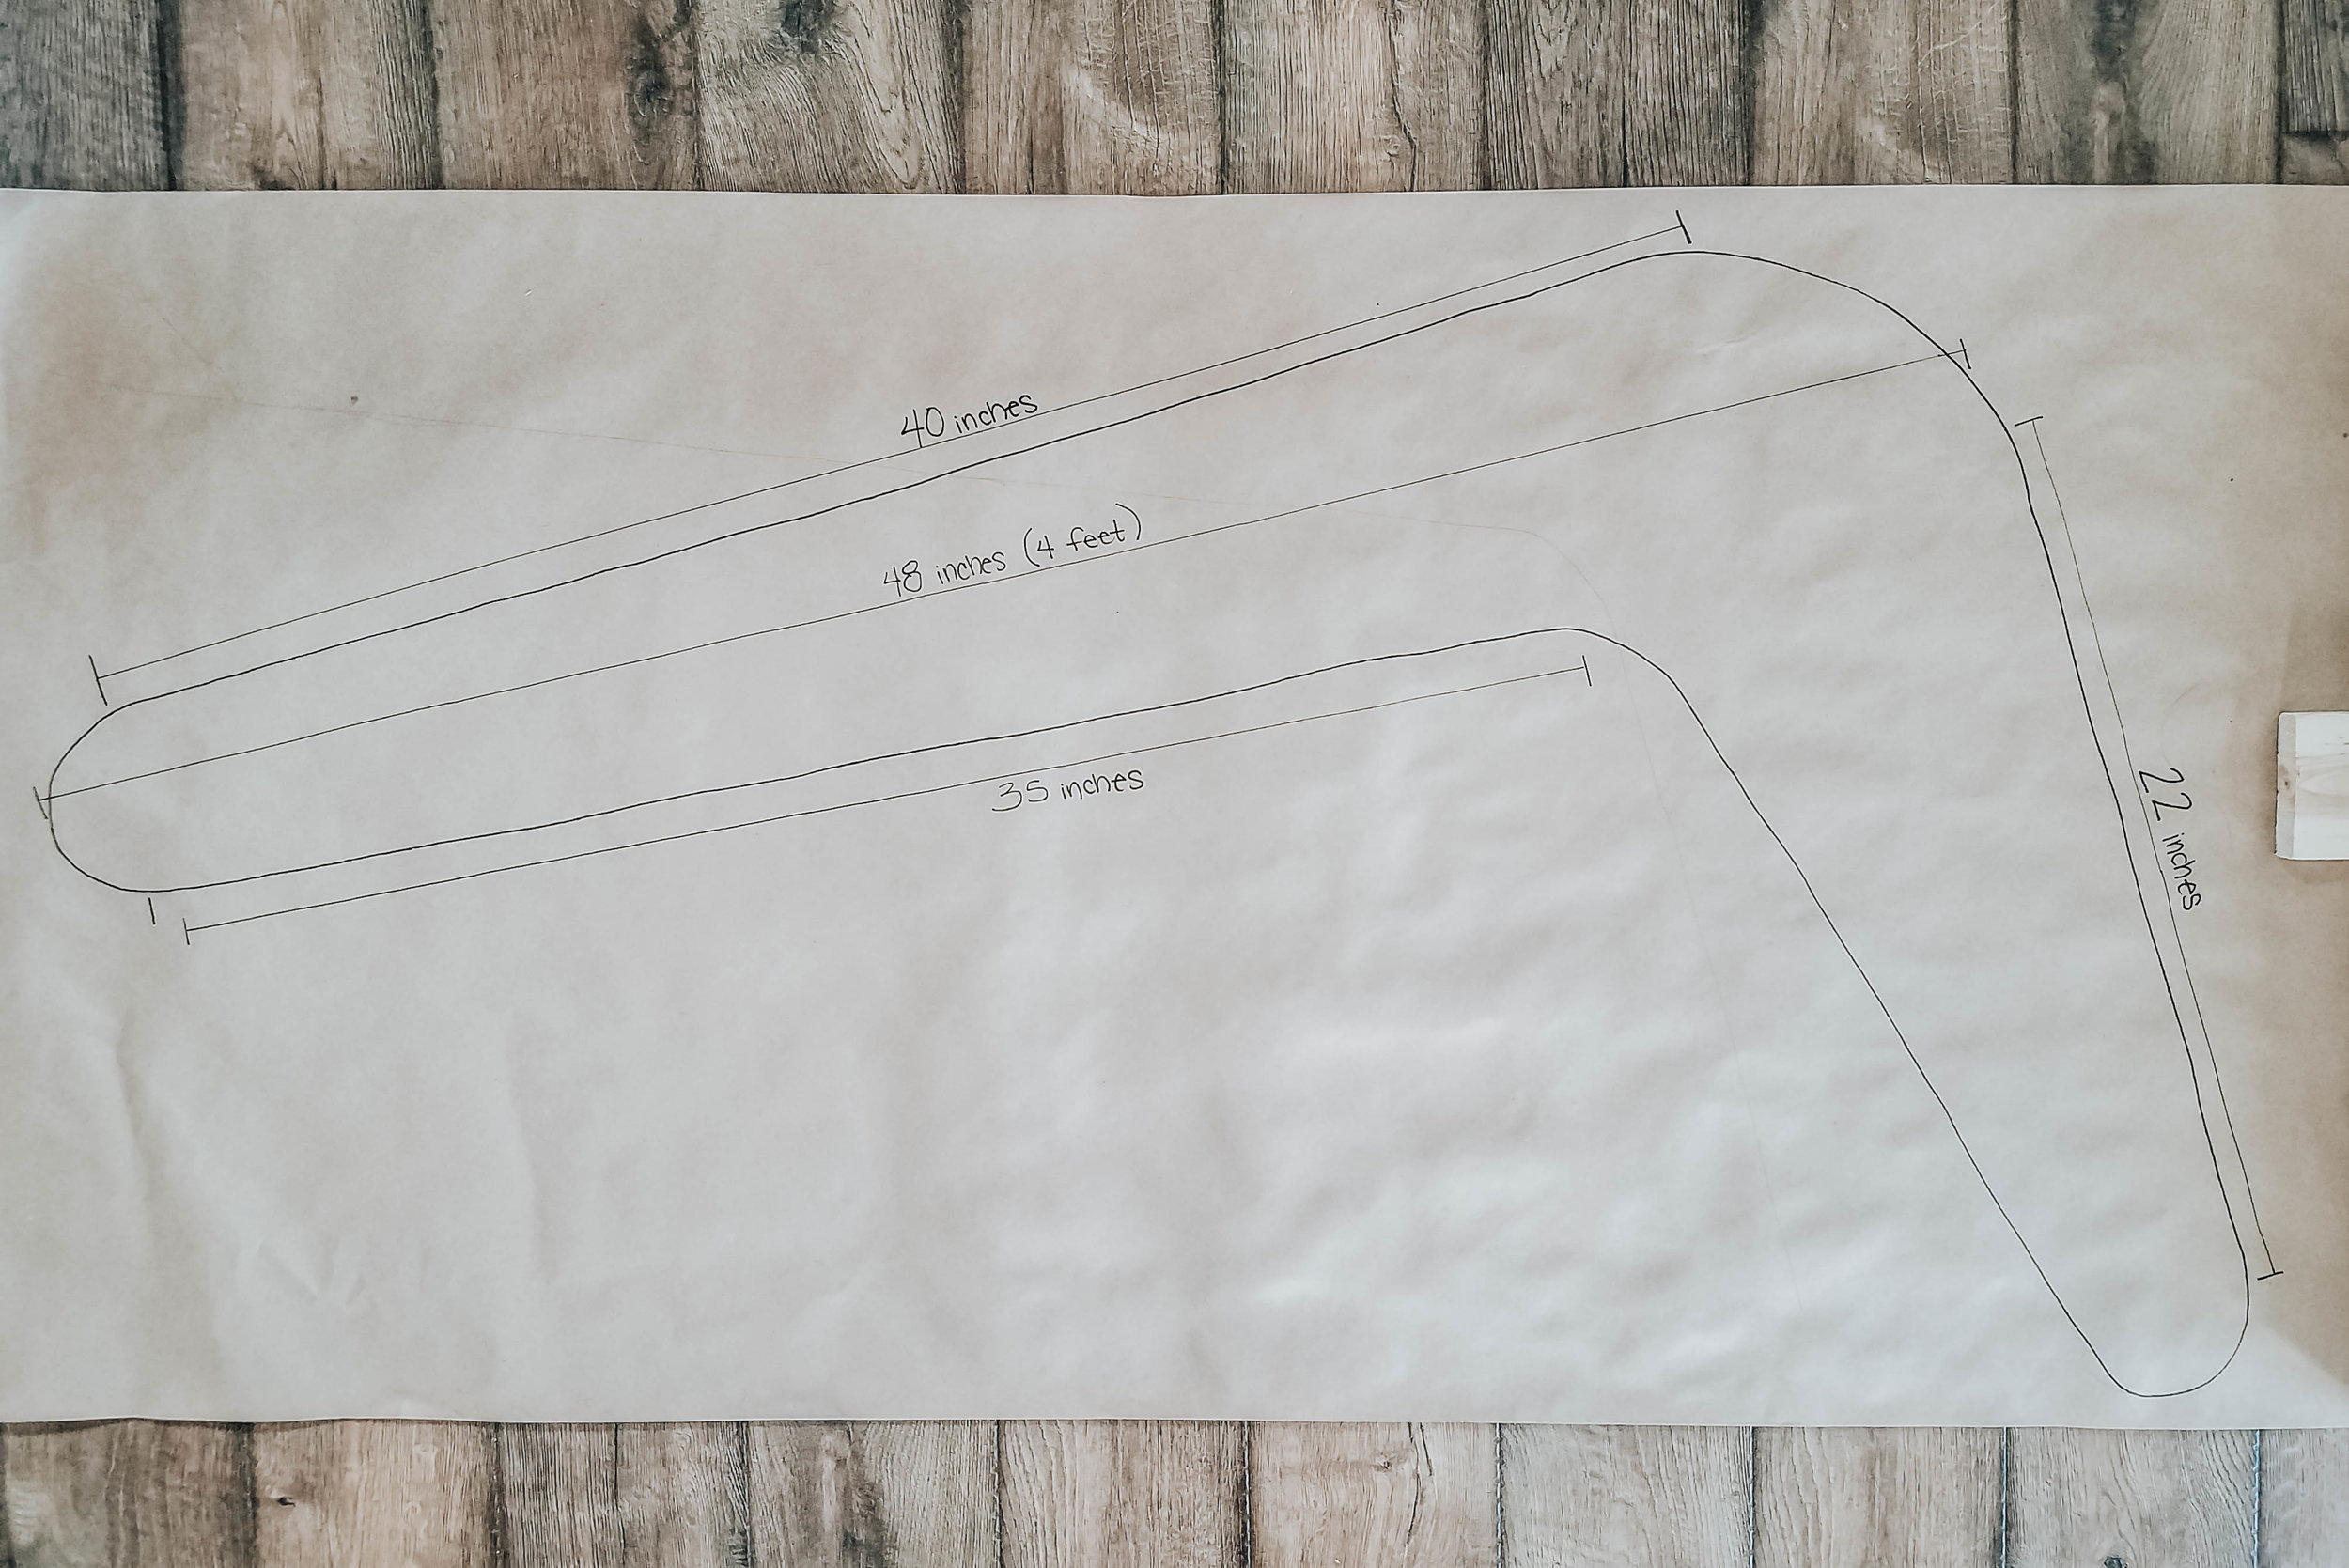
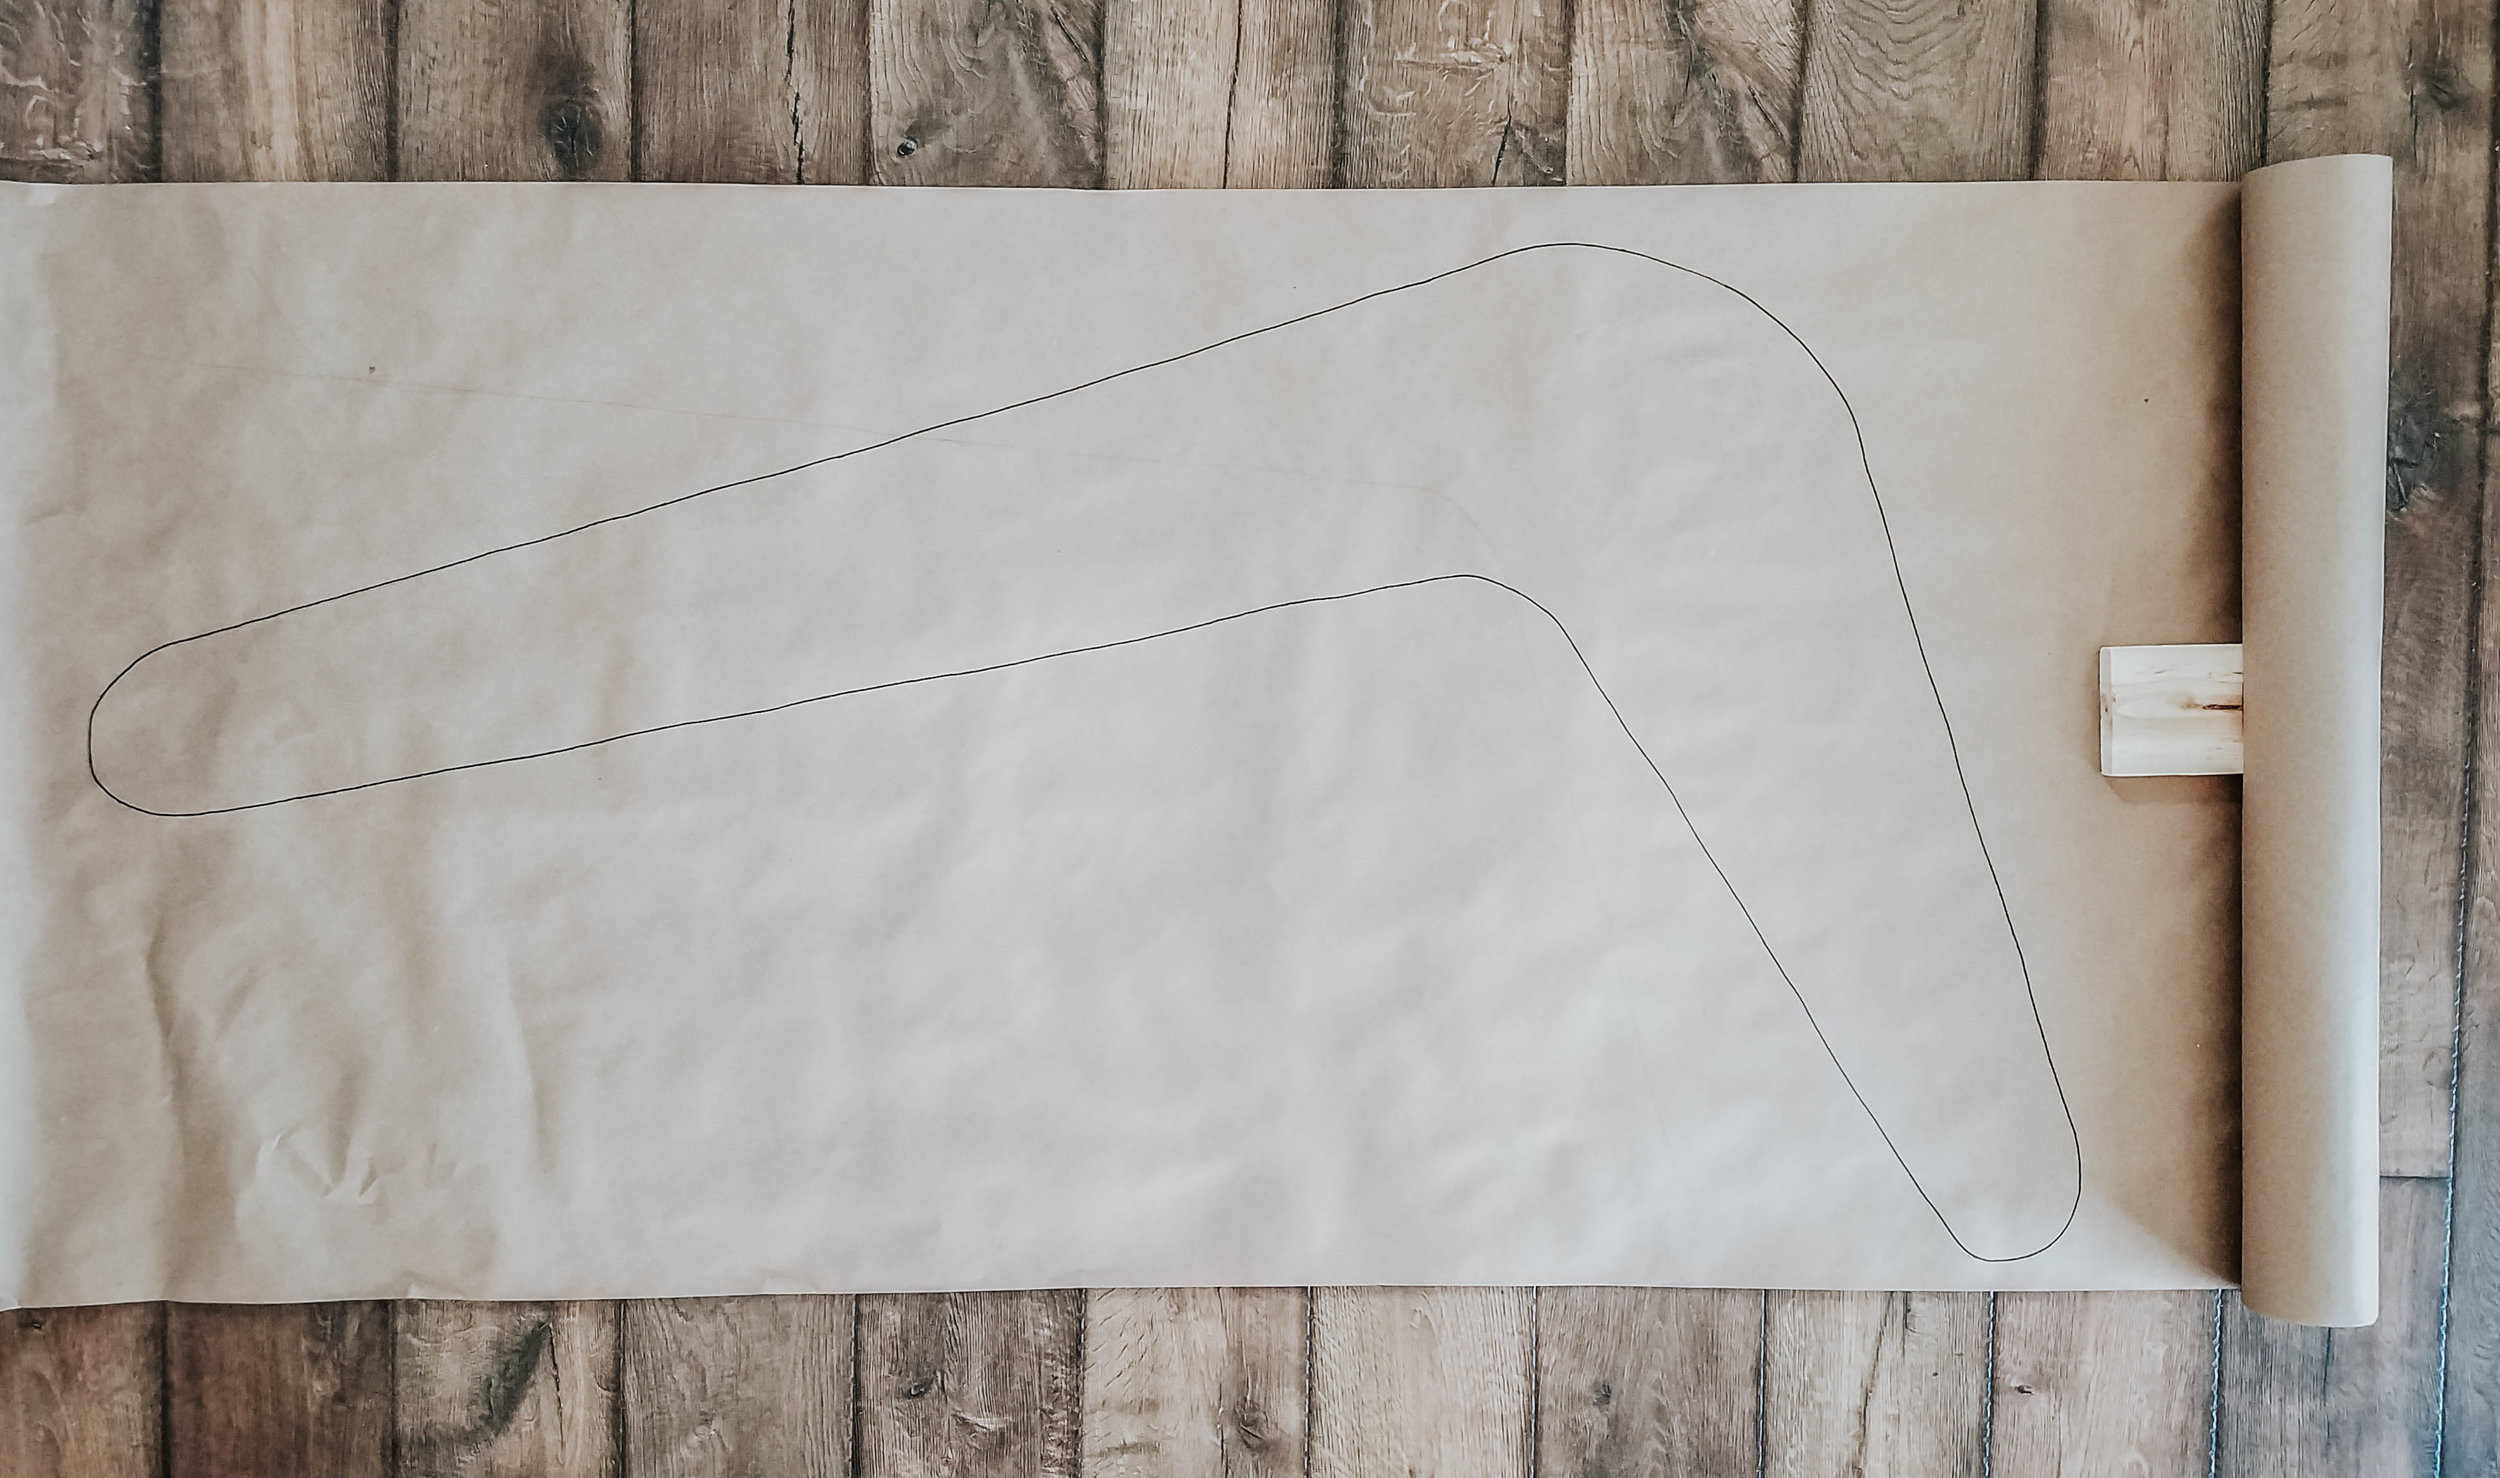
The first step is to draw out the sides of the slide. I am so sorry because I can’t figure out a technical way to get my drawing from my paper to your computer screen for you to print a stencil. If anyone has any suggestions, let me know.
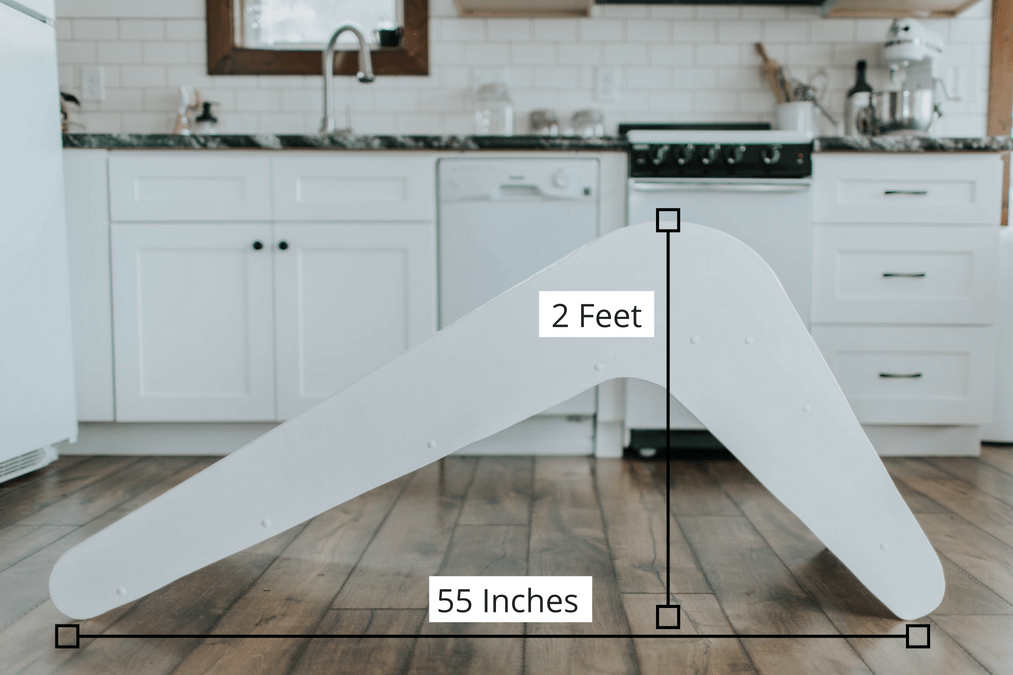
I didn’t have any type of stencil or guideline, I just free handed it. I knew how tall and long I wanted it, so I can give you the basic measurements, but I think you’ll just have to draw it to the best of your ability.
This is the exact shape of my slide. I’ve included a few different measurements so that you could get an idea of how long the sides are, but there isn’t really a way to give you exact measurements.
I started out by drawing the shape onto a roll of brown craft paper to avoid having to draw and erase multiple times on the plywood. I used a yard stick to help draw my lines as straight as possible.
This part doesn’t have to be perfect, just do your best and expect to have to erase and start over a few times.
Again, these measurements are just to give you an idea of how long each piece is – I wish I knew an exact way to tell you but I think this should give you enough information to free-hand it pretty close to my drawing.
Step Two:
Cut the shape out and trace it onto the plywood.

Step Three:
Use a jigsaw to cut out the first side. You can also use a skill saw for the long straight cuts (this will help keep things straight).

Step Four:
After we cut the first side out, I traced the cutout onto the plywood again, just underneath the first. I didn’t use the original brown paper tracing because I knew my cut probably wouldn’t be perfect and I wanted them to match as closely as possible.
Step Five:
Use a jigsaw to cut out the second side. Again, you can also use a skill saw for the long straight cuts (this will help keep things straight).

Step Six:
Next we used a table saw to cut out the remaining pieces (the seat piece, slide piece, and ladder piece).

Measurements:
Seat Piece: 7 ¾ inch (L) x 16 ¼ inch (W).
Slide Piece: 39 ¼ inch (L) x 16 ¼ inch (W). *see below for additional cutting instructions. This piece needs an angled cut at the top for the pieces to fit together correctly.
Ladder Piece: 18 ¾ inch (L)x 16 ¼ inch (W). *see below for additional cutting instructions. This piece needs an angled cut at the top for the pieces to fit together correctly.
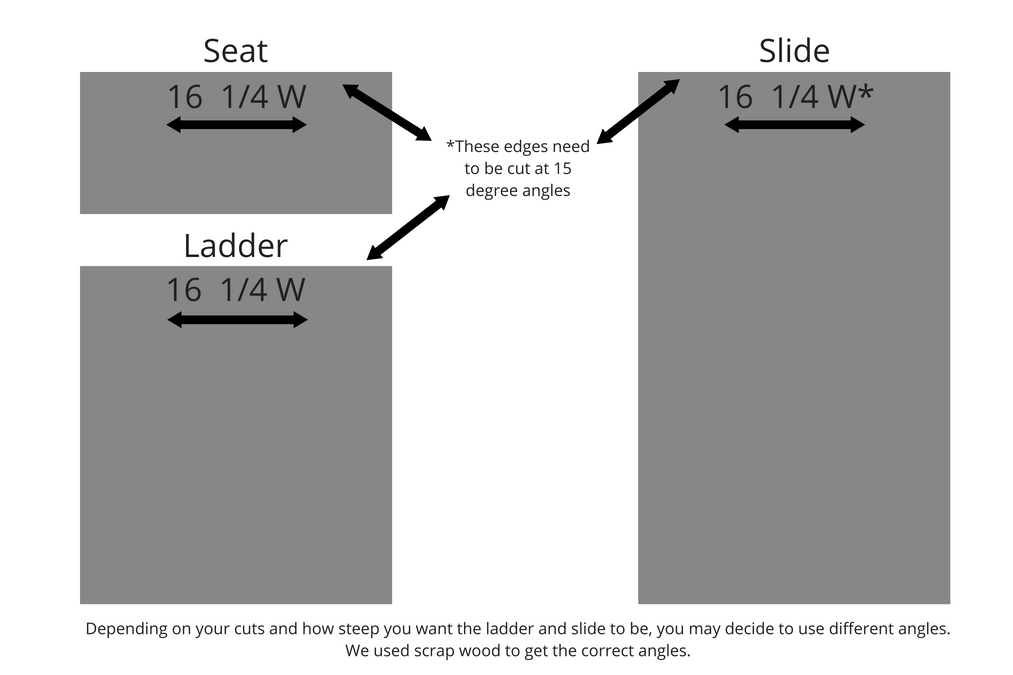
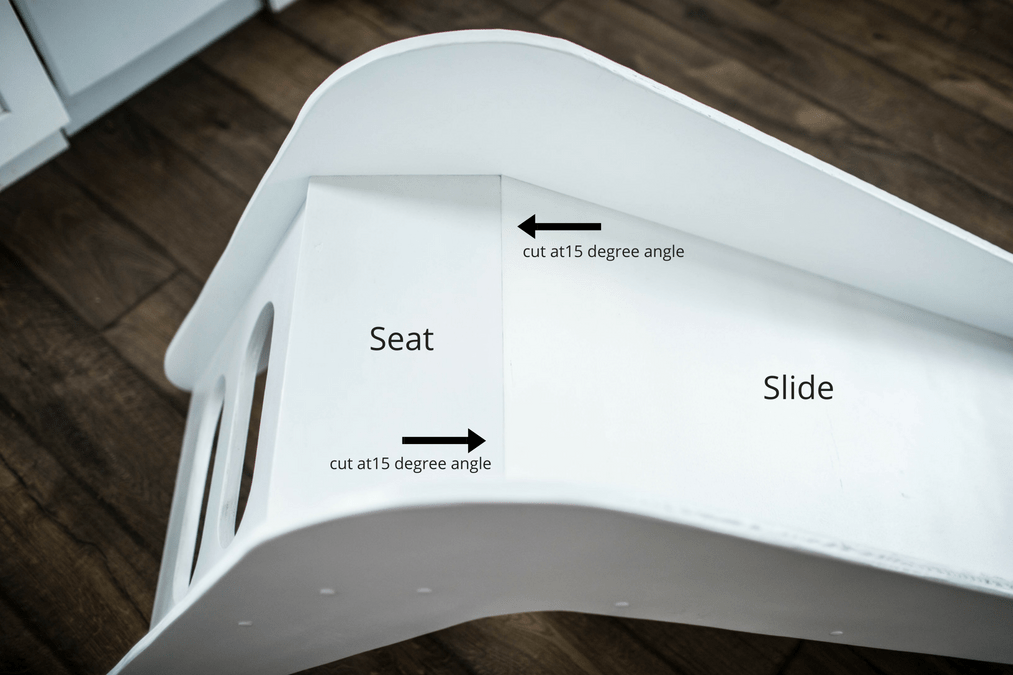
Additional Angled Cuts:
The top of each piece needs to be cut at an angle for tight connections and to create the angle of the slide.
We used the table saw to cut the 16 ¼ sides of each piece at approximately 15 degree angles. Be careful, depending on how your pieces fit together you may need to adjust the angle of the various cuts–we used scrap wood to get the correct angles. Start with 15 degree cuts and then piece everything together to see how they fit. (For example, you may want your slide to be steeper, in which case you would cut the angle more than 15 degrees).
Step Seven:
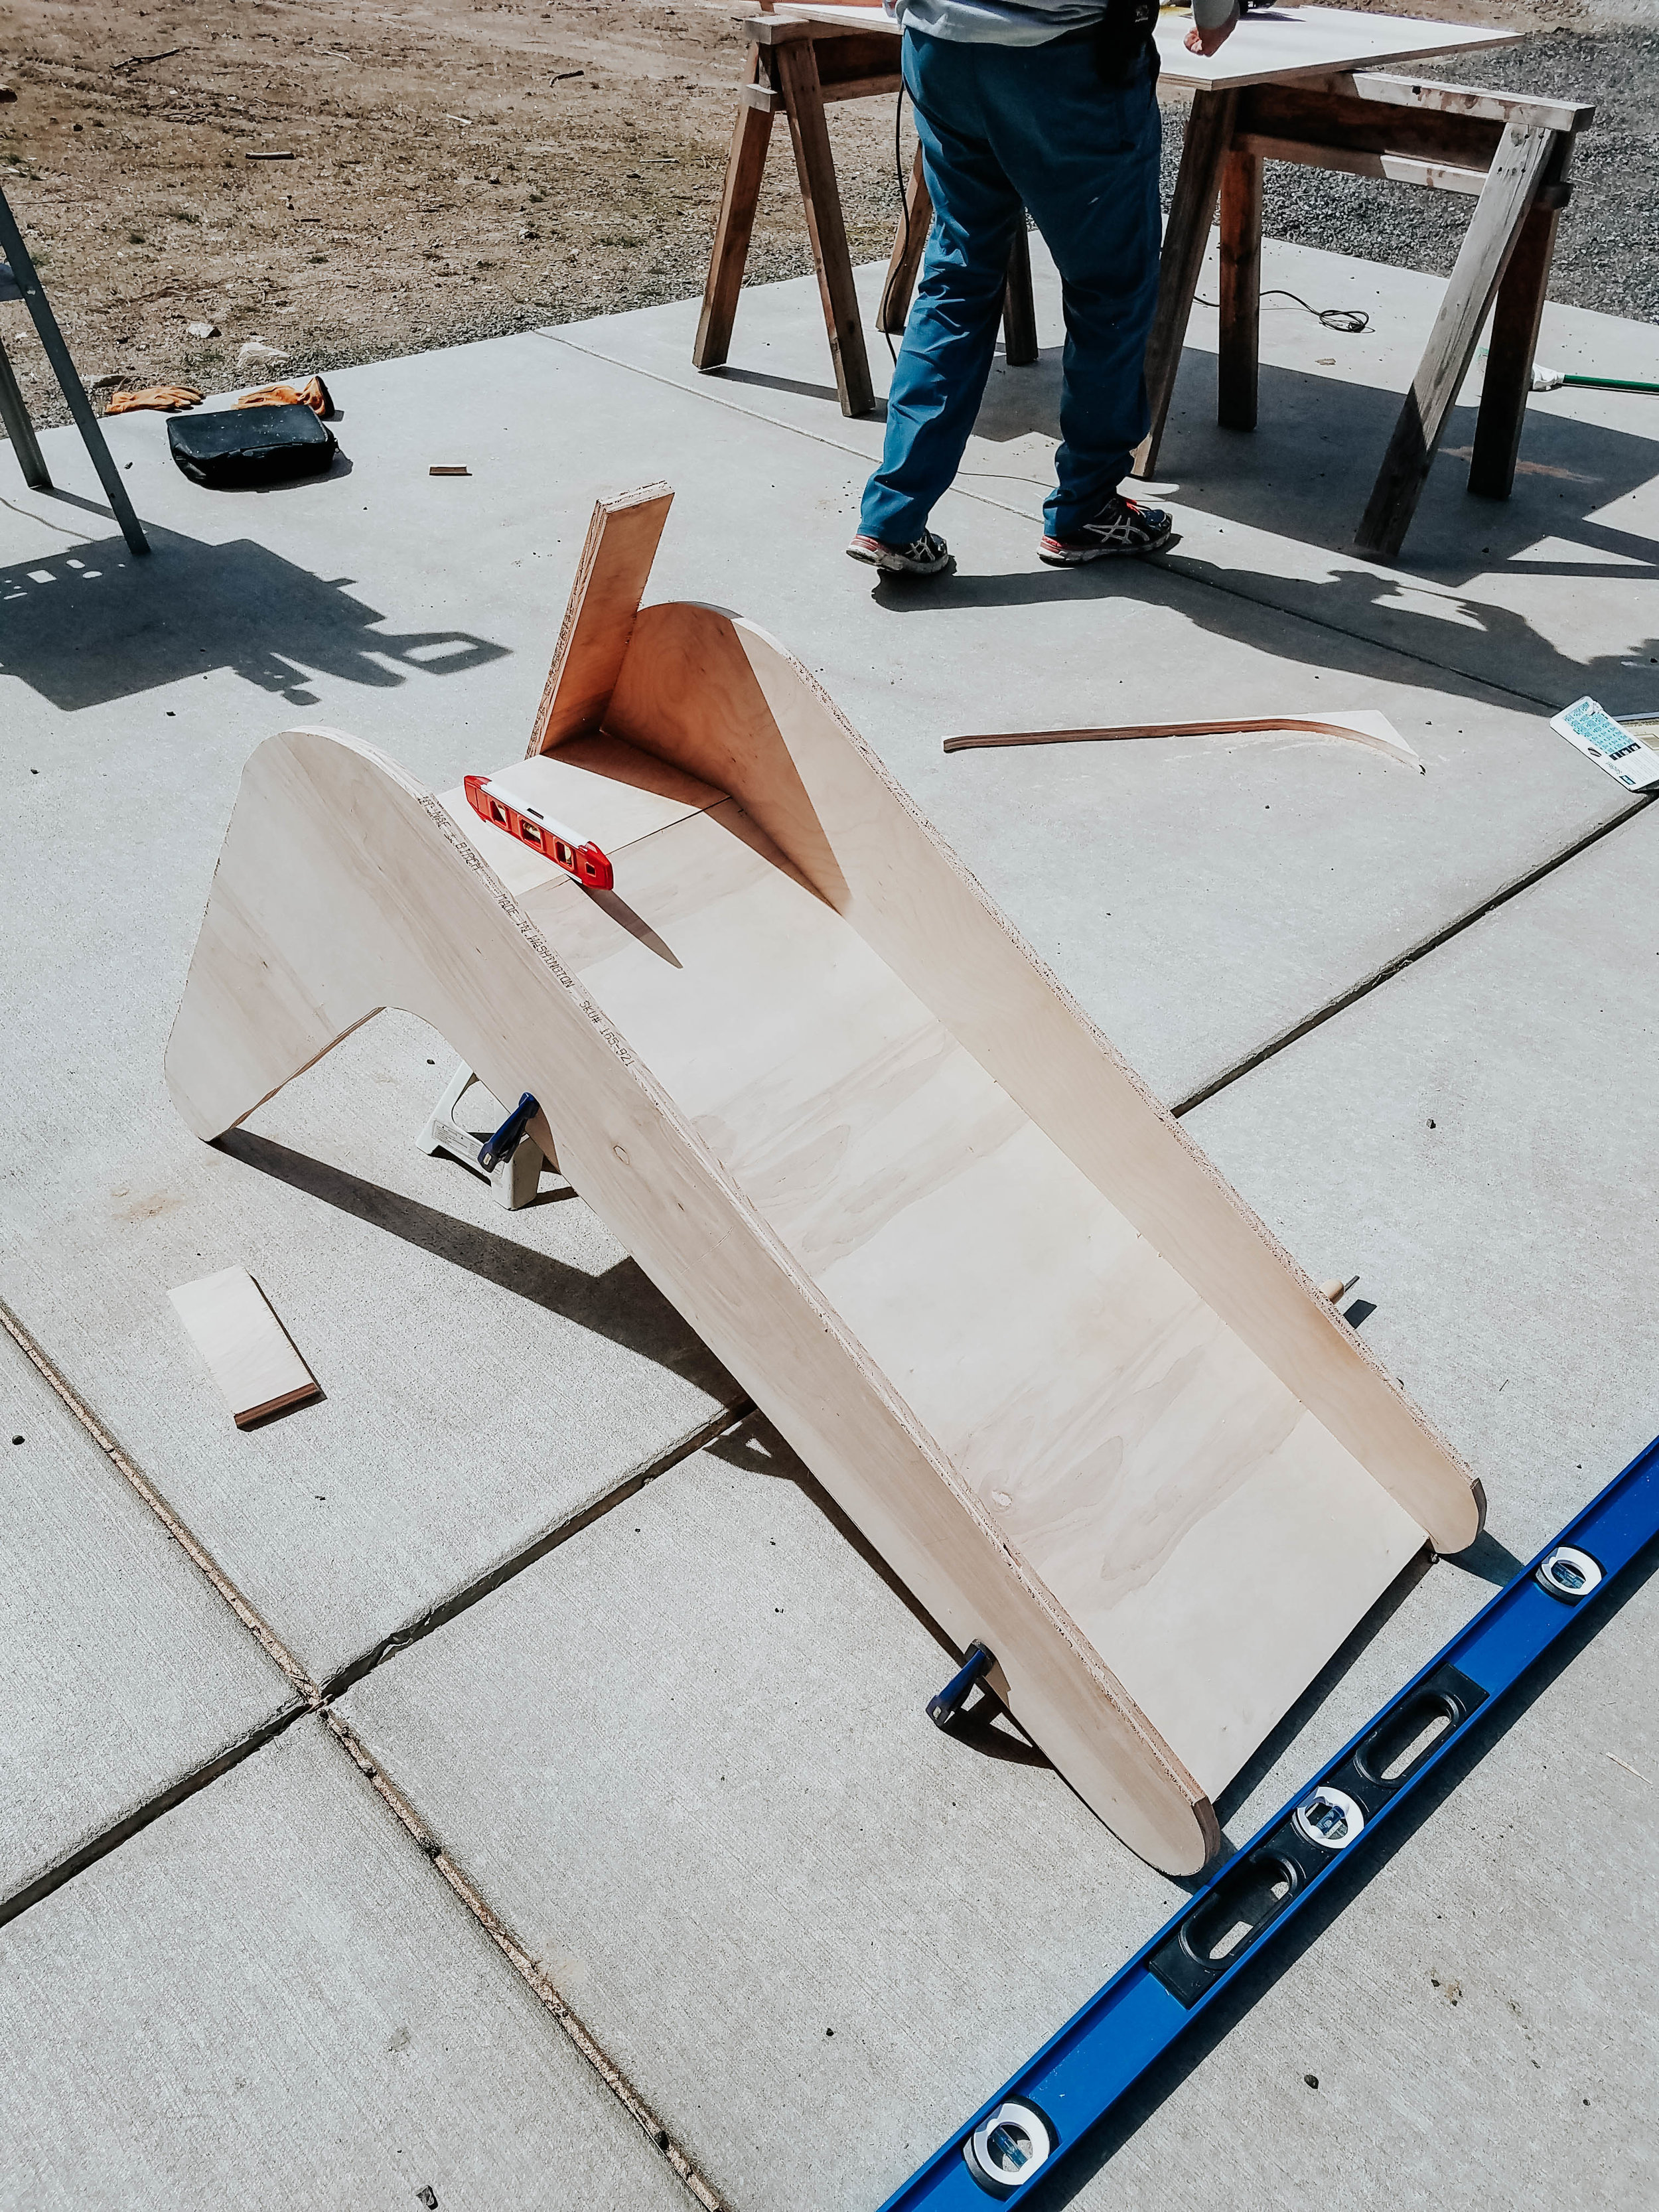
At this point we used wood clamps to put the slide together to make sure all of our pieces fit together correctly. You may want to do this step just to check all of your cuts and make sure everything is the correct length etc.
Step Eight:
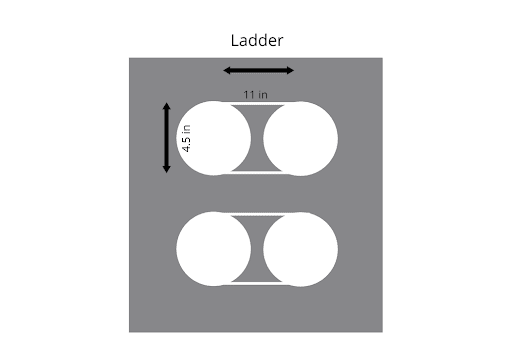
Create the steps in the ladder.
We made the steps 11 inches (L) x 4 ½ inches (W)
We used a 4 – ½ (114 mm) hole saw to drill two holes like this:


We then used the jigsaw to connect the holes and create the oval shape of the steps.

If you have access to a band saw, this would probably be a more efficient tool to use. We don’t own one though, so we used what we already had.
If you don’t want to buy the hole saw, you could also just use the biggest drill bit you own to drill a hole and use the jigsaw to cut out the oval shapes. It’s the same idea, just more work with the jigsaw.
Step Nine:
Sanding. The worst part of any project.

Sand all of the pieces, front, back, and all sides.
I used an electric sander and was super thorough because I didn’t want my son to get any splinters from sliding down or holding on to the edges.
Step Ten:
After the sanding was finished, I used a paint + primer and painted all of the pieces, front and back. I like to paint my projects before I piece them together, because I think it’s easier, but you could also wait until the very end to do the painting.
I had to do multiple coats.
Step Eleven:
Once everything was dry, we took the pieces and clamped them together.
Step Twelve:
While the slide was clamped together, we screwed all of the pieces together.
Here is where we placed the screws:

We started by attaching the slide piece first.
We used #8 x 1 – ⅝ construction screws.
You need to have a really steady hand and drill straight or your screws will come out through the top or bottom of the slide piece.
Next we attached the seat piece. We did two screws on each side.
Next we attached the ladder piece.
Step Thirteen:
Once everything was screwed together, I used my paint to touch up any spots that needed it.
Step Fourteen:
I decided to do a clear coat over the entire slide. I used a can of Satin Clear Gloss Spray (Krylon Colormaster Acrylic Crystal Clear Gloss Spray. Make sure that you buy a can that says it is a non-yellowing clear.
I used the clear coat for two reasons: I didn’t want any white paint to rub off on my sons clothes when he slid down the slide and I wanted the slide to be a little more slick.

This ended up working perfectly. The slide piece is super slick and he can slide down no problem.
Before you spray anything, make sure to test the clear coat on a separate piece of wood or on the underside of the slide. Some clear coats will turn white paint yellow. I had to make a second trip to the store to find a non-yellowing one. The one pictures above worked great! (I did multiple coats).

There ya go! This project has a lot of steps to it, but I promise it’s worth it. Locke plays with it every single day – it keeps him so busy! He loves rolling toys down it and he climbs up and slides down on his tummy over and over again.
I love that we built it ourselves and that it isn’t an eye-sore. We get compliments on it daily because of how cute it is!
If you end up building one of these slides, I would LOVE to see it! Tag me on Instagram and show me how it turns out! If there are any sections in this tutorial that need clarification, leave me a comment and I will get back to you asap!
You don’t have to be a professional to take beautiful, story-telling photos.
The Portraits of Us course will show you how.
Portraits of Us is a comprehensive online course that will walk you through every step of how to take pictures and equip you to take beautiful photos.
